Tuesday, June 14, 2011

Post #35, 6/14/11 LR Quarter Install & Wheelhouse Mods

65 Mustang Restoration

The game plan for this last weekend was to concentrate on getting the LR Quarter to fit properly & to get it prepped for mounting,,, which also included a bunch of other steps,,, mainly, the trunk floor pans.
For the um-teenth time we installed, removed, and re-installed the quarter tweeking a little here & there as we went. Once we thought we had it where we wanted it, we grabbed the end cap & the deck lid to once again make sure everything looked square. Overall it looked pretty good, but the back area where the end cap bolts onto was off a bit, requiring a bit of fixing.


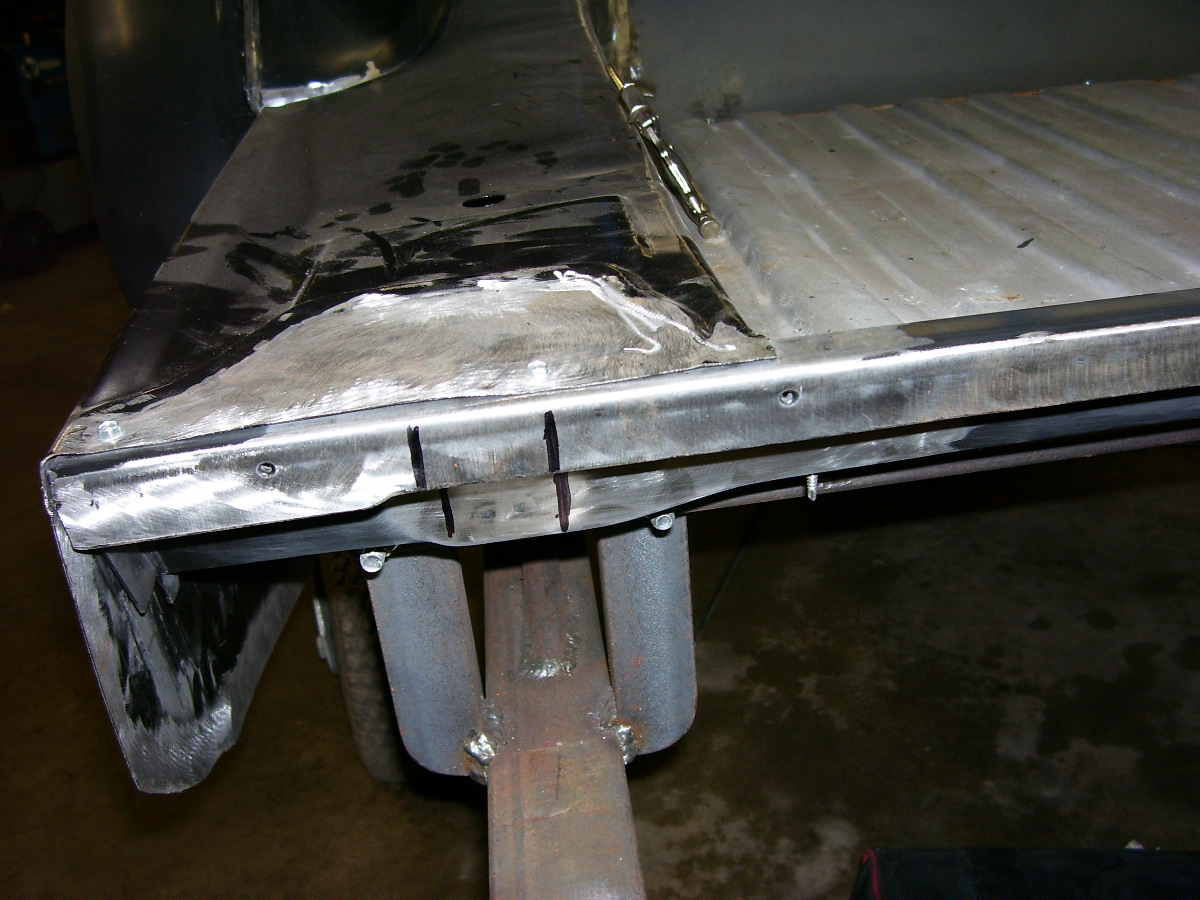
This is the underside of the quarter,, though it's a bit hard to see, the silver marker line indicated where I needed to trim the metal so I could lower the corner a bit,, just a couple of spot welds & a quick trimming,,, or something like that.


This is the modified/corrected corner,, not to difficult, just time consuming,, like everything else,, but the end result will be much better fitting body lines,,, and that is the goal,, right? Next!

With that, it was finally time to get the wheelhouse lip corrected, something I've been stalling on and not looking forward to doing, but I guess it's time to suck it up and get after it.


Well that was quick. So,, the problem was that the curvature of the wheelhouse wasn't like the curvature of the quarter panel lip. Both of the lips, at the bottoms, were actually right on the money,, but at the top, there was approx. a 1" gap between the 2 lips, and there was no way they were ever going to be squeezed together. 

Solution:  I had also previously bought a "set of 4" individual wheelhouse panels, 2 inners & 2 outers. With the quarter installed, I started by seeing where the 2 lips fit together properly on the front side & made a mark(on both panels) where they were just starting to not fit properly. Then we removed the quarter. Once removed & on the bench, I was able to see how well the lip of the extra wheelhouse panel fit against the lip of the quarter. It fit very well, so I cut the entire lip off of the extra wheelhouse, approx. 2" up the side, and then I attached it to the quarter with several self-tappers to hold into place, I then marked the new lip 1/2" past the mark I had previously made on the quarter in the front, then I removed it & cut the excess off of the new lip, and then re-screwed it back on.

Before I installed the quarter, I had to cut off the lip of the wheelhouse on the car, approx. 1/2" up, on the side so that the old lip wouldn't be in the way,,  then we re-installed the quarter panel, clamping it into place so that both wheelhouse lips/ledges were in a relaxed position. I was then easily able to mark along where the 2 panels touched each other at the edge,,, once marked, I removed the quarter, then removed the new lip, and trimmed off the access metal approx. 1/4" above the mark I just made. Once done trimming, I sanded off any paint on ALL(inside & out) of the surfaces that would interfere with welding the lip onto the car. Sanding completed,, re attach the lip to the quarter,, reinstall the quarter.

Now tack the new lip in place from the bottom side all the way around & then remove the quarter panel. Now finish welding the entire bottom side of the lips, an inch at a time, skipping around, to keep from warping the panels. Once that is done, now it's time to weld the entire outside of the lips,, using a hammer & dolly as you go,,, then grind off any access weld.


See, now wasn't that easy? Now we have a proper lip that matches up perfectly to the quarter like it should. And you wonder why it's taking us so long and why the price tag will be over 25K once completed.


NEXT,,,, since the quarter was already off,, again,,, we deiced to finish prep it for final install. The entire inside was sanded/scuffed and then all of the edges, where it'll be weld to the car, were taped off,, and then sprayed with Eastwoods Rust Encapsulator.  


Don't let the different shades worry you,,, we just gave the edges that won't get covered with Fat Mat, a couple of extra coats of Encapsulator. 


Side Note,,, here's one of those silly little things you don't want to over look and forget to do,,, If you plan on running quarter panel ornament, it's a whole lot easier to get them drilled with the quarter off of the car. I sure would I would have kept the old one for a template,,, who knew????


Wow, what a difference this made to the sound of the quarter. I love the quality of this sound barrier. This is the 70 mil. Extreme Rattle Trap Fat Mat. This stuff goes on really well, the only draw back is, that if you have to remove a piece,, hope it's a small piece, cause it doesn't like to be removed,, Good Stuff,,, and about 1/3rd of the price of Dynamat.

That's all for tonight,, I should have more for you possibly tomorrow night.

Till then,,,


Friday, June 3, 2011

Post #34, 6/3/11 Fitting the Left Door, Quarter Panel & Tail

65 Mustang Restoration

So on Labor Day Weekend we were finally able to get back to work on the Mustang. Here's a recap of some of that work,,,


 1st on the list, after combing the garage for the hinges, was to mount the driver's door so we could see if it was going to fit worth a hoot, and also to help with the alignment of the rear quarter panel. I was pretty happy with how the door fit.

 
 Here you can see the lip that the quarter panel gets welded to. When we picked this car up, the quarter was already completely taken off, which definitely has it's pros & cons. By having the door installed, it made it much easier to straighten the lip(not done yet when the pic was taken).


 Since a good Pack Rat never gets rid of anything, we were able to compare the new "Ford Tooling" rear panel against the original,,, keeping the old parts is probably one of the brightest things I've done. It sure made it nice for measuring everything,,, I was very happy with all of the dimensions,, it really looked close to the factory piece(less all of the rust).


 The new rear panel didn't come with the holes where the lower valance attaches to (the rear frame brace that the back panel attaches to is pre-drilled), so we used the original holes as a template and before we drilled the holes, we double checked the markings with BOTH the new valance & the rear brace,,, looked good. This also helps to make sure you don't put a lump of super hard weld in one of those areas.


 Then we started fitting the quarter that we got from Laurel Mountain,, which is a ton closer to fitting properly than the one we originally got from CJP. We then did a quick test fit of the corner brace,,, needs a bit of tweeking, but it shouldn't take much. As you can also see,,, I don't think it's possible to ever have enough pairs of vise grips,,, and it takes a Bunch of different sizes to get the job done. We have also found that when fitting panels together that you'll be taking on & off a lot, it's really nice to use some #8 small self tappers to actually screw the panels together,, this really helps lining everything back up in the same spot each time you install the panel,, and it's an easy hole to spot weld shut when you're doing final assembly.


 This area fits sooo much nicer than the other panel did,,, though not perfect, it'll be much easier to repair/modify. The overall fit of this area is really nice.


 For an initial test fit, I thought the door gap area looked pretty good,, we can easily slide the door back a bit,, remember, we just guessed where it should be when we first installed it.


For the most part,,, the general fit of this quarter panel was pretty good. One thing that is kind of a pain though, is all of the grinding it takes to remove the black coating where everything will be welded together,,, this is very time consuming,,, but it needs to be done. 

At this point, the main thing we need to finish, is the redesign of the wheelhouse lip so it attaches to the quarter properly,,, I have a pretty good start on that, but it'll have wait until next time.
Till then,,,,


Thursday, June 2, 2011

Post #33 6/2/11 Steering Gear & New Parts Arrival

65 Mustang Restoration

We're Finally Back!  After a long winter of cold & Ebay'n,,, it's finally time to get back to work.

As we left off last season,, we were extremely disappointed with the CJ's quarters that we had just tried to fit, which were absolutely worthless,,, since then, we ordered in another set of quarters from Laurel Mountain Mustang, along with a new front tinted windshield. Here's a big tip,,, if you have to order something that has to be truck freighted into you,,, buy everything big that you can think of,,, it'll save you a fortune in later shipping costs. For example,,, the truck freight for the quarters was approx. $142.00,,,, which is approx. what it would have also cost to get my windshield sent to me later on down the road, but by buying it at the same time, it only cost me an additional $4.00,,, BIG SAVINGS!

Before we start with what we did last weekend,,,, Lets look at some of the new goodies that showed up on the truck today. The first couple of boxes we got came from our friends over at Chockostang, out of Illinois. They do extremely nice work, and Dan, the owner loves to talk Mustang! 


Dan & his crew took care of just about everything I needed for my steering needs.
 

 Here the freshly rebuilt, large neck power steering pump that they did all up for us. They massaged the tank portion and made it look like new,,, it really looks nice.


 They also supplied all of the new hoses that we'll be needing. Gosh I love new parts! They're like all nice & clean!


 These are the two rebuild kits that are for the control valve & the power assist cylinder.


And last but not least,,, here's the nice 4-turn box that I had them go through(and a new idler arm). I sent along a can of Eastwood's Brake Grey Paint so they could coat the entire assembly when they were done with it to help keep it looking nice for a long time. I chose the Brake Grey for the Cast Metal finish,, the large amount of Stainless Steel that it contains, it's also brake fluid resistant,, and it withstands heat up to 400 degrees. This will be the coating that we'll be using on just about everything that's suppose to look like cast.

Chockostang
1624 Chock Rd.
Murrayville, IL 62668
(217) 882-2083


And then there was the large pile from Laurel Mountain, I talked with Lou who was very helpful making sure I got everything I needed,, and even some things I didn't know I needed,,, It's great to have someone like that to talk to when you're not 100% sure on everything.


 Starting the list,, is a new set of bumpers & the bolt kit,,, the chrome actually looks very nice,, much better than I was expecting,,, just packed with a bit of oil residue.


 We also got the window felts along with the new felt lined, window guide tracks/channels.


 Here's the new pre-bent fuel line,,, they have to bend it with a big arc so it'll fit into the box.


 Here's the new steering wheel & the dash bezel & knob kit.


 We also ordered their weatherstripping kit, which contains just about every piece that you'll need for your car,,, I bought the other vent window strips & the above tracks,,, so we should now have everything.


And lastly,,, here's the new speedo cable & the nice little Brake & Fuel Line CLIP Kit. The only item that was back ordered was the brake line kit,,, but it'll be here long before I'll be ready for it.

Laurel Mountain
113 Mustang Lane
Ruffsdale, PA 15679
1-888-925-PONY

Well that took to long,,, I guess we'll try to post what we actually did to the car tomorrow. 

Till next time,,,,