Monday, July 25, 2011

Post #42, 7/25/11 Finishing The Trunk Area

65 Mustang Restoration

Wow,, what a lot of grinding! Sorry I haven't done much reporting,,, but with only a limited amount of time, the 110+ degree weather, and a ton of grinding,,, there just wasn't a bunch to yap about. However, that doesn't mean I've been slacking in the ordering of new & used parts,,, several new orders are on their way. One of the sweet items that did show up last week was, a nice factory 1965 AC Evaporator unit, that looks to be in very good condition,, but we'll still be going through it,, more on that, later in the build.


Even before all of the grinding was done,, we decided to take a break and take care of the spare tire dilemma. When it was first set into place, it rocked all over the place,,, mainly due to the rear bumper support brace, which you can see, has now been modified to help with tire clearance. It's still very strong,, probably stronger than the stock one, since we drilled through the brace, then the floor pan & then were able to weld the brace directly to the new frame rail itself,, much stronger than just welding it to the tin floor pan. 

Once that was welded into place,, we positioned the spare tire into it's new location, and marked the spot where the mounting bracket would need to be. We were able to reuse the factory bracket(since new ones aren't available yet) but since it was in great condition,,, it'll work out just fine. And instead of going through the center of the wheel,, the mounting bolt will actually go through one of the wheel's lug nut holes,, and we plan on using a chrome lug nut to hold it into place.


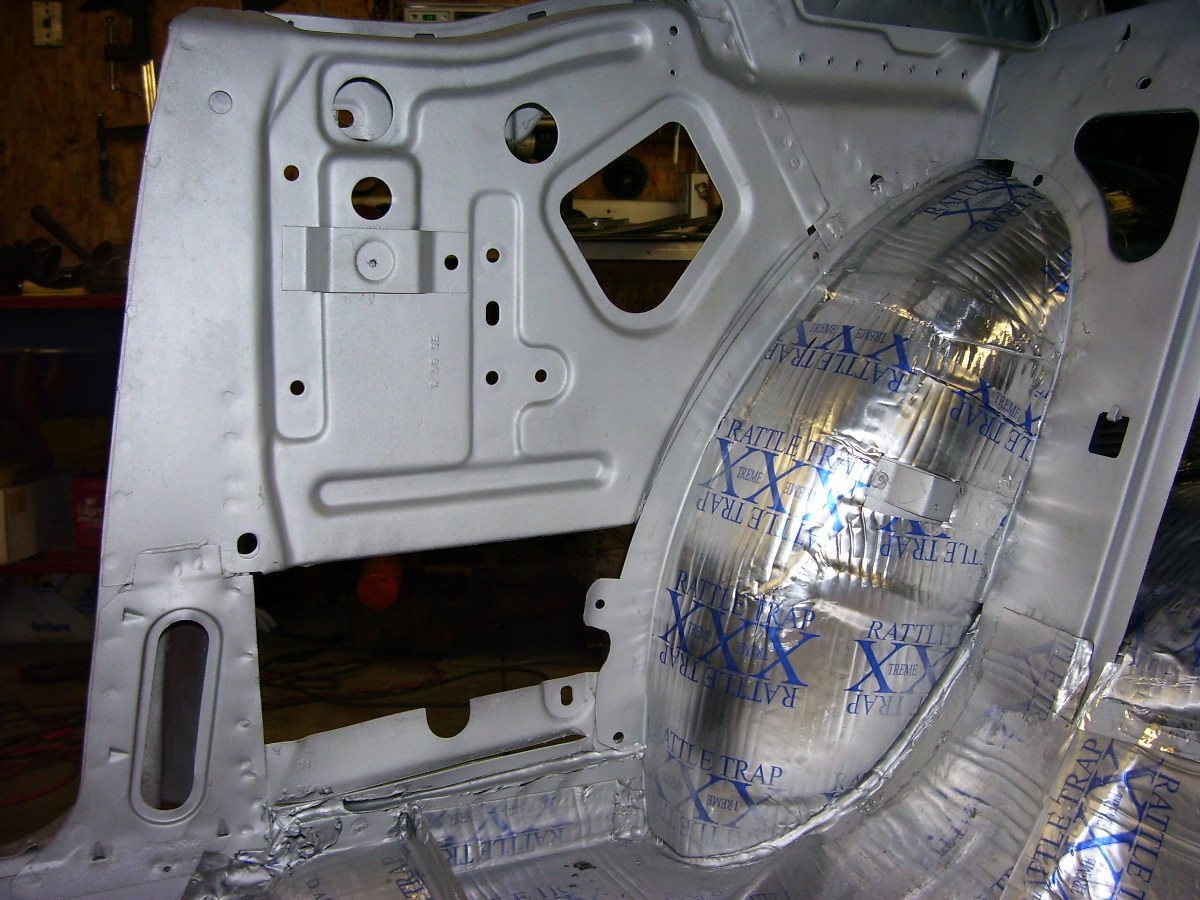
Once that was done,, along with the rest of the grinding,,, we cleaner her all up & coated everything with some more Rust Encapsulator. Before we finish off the sound mat installation, we will need to get all of the inner seam sealing done,, maybe next week. (once again,, sorry for the spots in the pics,, it's not the camera,, it's just particles floating around in the air, only visible to the camera)


The wheelhouses were also coated,,, and will also need some seam sealing done,, along with a layer of that rough looking black coating that also acts as another layer of sound deadening,,, like what came from the factory.
 

I still have to build a patch to cover that rectangular hole you see, since I want it to be covered better than with just seam sealer. You may also notice that we have added a light layer of "All Metal" to the wheelhouse/quarter panel lip,, just want it to look a bit nicer.
 

We also shot a coating of silver Encapsulator in both of the rear quarter window areas,, and will also be adding a bit more seam sealer along the bottom.
 

The guys from the body shop also wanted us to get the first layer of "All Metal" installed on the quarter panel seams. Even though it'll be a while be for we get that far,,, it will also keep that area from rusting up by sitting open in the humid air. 

All for now,, I just have to see what shows up in the mail this week, and get ready for next weekend's seam sealing party. 

Till then,,,,,


Monday, July 11, 2011

Post #41, 7/11/11 RR Quart Install

65 Mustang Restoration

Well, we got the right quarter panel installed today,,, and it's all welded in. It's a pretty time consuming process,,, the welding isn't so bad,, the part that takes so long, is constantly repositioning the clamps around so the panels are tight to each other when you do weld them in.


We also finished welding in the rear panel & the corner brace.
 

I'm glad we opted to pre-install the Fat Mat sound deadner before we installed the quarter panel,,, cause it saved a ton of time & was three times easier than if we tried to do it while the panel was on the car. It's really amazing how much of the hollowness sound has disappeared from the car. 

Tip: when pre-installing sound deadner,, make sure that you're at least 1 1/2" away from any area that you have to weld on,,, and don't install it in any area where two panels actually have to touch each other when they're installed.


Once again it took a bit, but with a bit of effort, the quarter panel/door jam seam came out pretty good,,, I was a bit worried when I was hearing all of the horror stories about how aftermarket panels never line up. The next big worry will be how well the front fenders will line up.

It's hard to believe that we finally got the car to this point,,, the rear panels were a big worry for me when we started, especially since they weren't all there when we got the car,,,, but now,,, I'm very please so far with how everything has turned out,,, I hope it keeps going in the right direction!

It'll be a bit before I have much to report on,,, we have a ton of grinding to do! I think we may have solved the spare tire(not fitting properly) problem,,, I'll be doing a bit of bracket re-modifying,, but more on that later,,,,
Till next time,,,


Sunday, July 10, 2011

Post #40, 7/10/11 Rear Quarter Window Install


65 Mustang Restoration

Before we install the RR quarter panel, we decided we'd better figure out the whole rear quarter window situation, by which I mean, seeing if we have all of the parts it takes to install them,,, and seeing if we can actually figure out how it all goes together & how hard it'll be to install them once the quarters are both installed.


Here's the pile of parts that you need to install a rear quarter window,, this should be all of them, minus the new window seal & grease for all of the slides.
 

When I first decided to tackle this project, I had absolutely NO idea what parts I all needed & definitely No clue how it all went together, thank goodness for the guys on the Vintage Mustang Forum, they sent me a link with this photo, which sure made life a bunch easier! It showed all of the parts except for the little odd shaped L-bracket in the bottom right of the 1st picture,,, if you look hard you'll see it installed in photo #10.


Before we started we made sure that the window slide up & down in their tracks,, without binding,,, because we cleaned everything up previously, this wasn't a problem, even without the lube in the slides.
 

After removing the window, we then attached the (2) aluminum L-brackets(upper window stops).
 

This is the quarter window area on the inside of the car.
 

And here's what that area looks like from the outside of the car, without the quarter panel installed(normally you won't be able to see this view with your car),, just thought you might want to see it.
 

The first couple of items we installed were the window regulator & the L-shaped slide,,, just start all of the bolts before snugging them down. We also installed the bottom L-bracket(see photo #9)

NOTE: There are 2 different length bolts that mount the majority of all of the parts in this assembly,,, the longer bolts(I think there are 5 of them) are used in the areas where things are adjustable(3 in the bottom L-bracket, and 2 at the top where the large window slide plate attaches to the upper bracket of the car,,see photo #9),,, all of the shorter bolts hold everything else in place.


Next we installed the window,,, carefully lower it into the window opening & insert the regulator "roller" into the slide at the bottom of the window,,, this is easier with the regulator in the upper position.
 

Photo #9,,, here we slid in the large metal window slide/guide panel,,, this is a bit tricky, but not too bad,,, but since space is very limited in the upper window opening,, this is easiest with the window rolled all of the way down. This is where a "helper" is really nice and handy. You may also notice at the bottom,,, we placed tape over the all of the holes large enough gobble up any bolt that we might happen to drop,,, Cheap insurance from loosing a bolt in an area next to impossible to recover a bolt from.
 

Photo #10,,, In this pic(upper center), you can see the odd shaped L-bracket,, kind of looks like a sideways oil funnel when it's mounted in place,,, we come to figure out that this is also a "stop" that the regulator arm will hit against when the window is rolled all of the way up. 


In this pic(from inside the car) you can see the regulator arm attached to the slide in the window,, also in the center,, you can see the lower window stop is also installed,,, you just roll the window up a bit to get to the 2 bolts that attach it to the large guide panel.
 

Just another view of everything installed,,, see the 3 bolts going up & down in the center of the picture,,, the dark center bolt is the one that attaches the odd shaped L-bracket.
 

Next, making sure that the large guide's 2 upper mounting bolts (Photo #9) are loose,,,, we rolled the window all of the way up and adjusted the gap between the back ledge of the window & the window ledge of the body(easily done by sliding the window forward or backward) when the gap is all even, hold it in place & have your helper snug up the 2 upper bolts,,, easy.
 

Next we adjusted how the top of the window sits/points. This is done with the Bottom L-bracket(photo #9),, loosen the bolts,, position,, tighten the bolts,,, vwola!  DONE!!!
 

Once we removed the window assembly, we proceeded to install a bit more Fat Mat,,, as far as I'm concerned, you can't have too much,,, I can already tell a Huge difference in the sound of the car!


And lastly, we covered the inside of the RR quarter panel,,, and scotch-brighted it so the paint that will get applied latter will stick properly. Next on the program is to get the quarter mounted & welded into place.

Till then,,,,