65 Mustang Restoration
This last weekend, we were able to get a couple of things started on,, mainly the right side floor pan & wheel house.
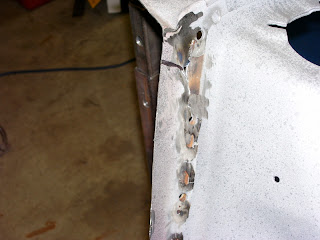
If you recall, once the car came back from blasting,,, a ton of rust holes showed up in places we weren't expecting. These pics are of the RF floor pan & the RR area under the rear seat,,, SURPRISE!!
Since I no longer have any short-term memory left,,, I find it very useful to take pics of just about everything & write myself notes where they won't get lost. It's those simple little details that you don't really think about until it's too late. Like the little bracket for mounting the rear seat, side panel.
We started by cutting the main floor pan out,,, parts of that, was a real pain,, especially since the last person that installed the floors did a pretty hacked up job,, in some areas the welds weren't even holding. We also started on the glorious job of removing the rt side wheel house,,, lol,, wow,,, I think the Only part of the car Not spot welded to the wheel house,, was the hood. What a job,,, and I'm still not completely done yet,, but good enough for now.
You can see in the last pic, how far they overlapped the floor pan. It looks like they were in a Big hurry to get it done,, "Quantity,, Not Quality". The floor support looked "ok",,, some-what,,, and when I saw the quarter size rust hole on the bottom, though I know it would've been an easy patch,,, I figured I better look into what some new ones might cost,, since there's no better time to replace them.
It's amazing what you can find on Ebay,,, Laurel Mountain Mustang was advertising a Nice New Heavy Duty set of front floor supports,, just like I was needing, so I ordered a set,,, they arrived today. Boy are they ever nice! Super Nice & Super Solid,,, very heavy-duty looking/feeling,,, I'm glad I bought them. It's been a motto of mine every since my dad told me that,, "If you're going to do it,,, do it Once & Right the 1st time"! I have found that even though there were times I couldn't afford it,, I found a way,,, and it has saved me a ton of time, money & effort over the years.


We started on fitting the new floor pan in,, but don't get too excited,, there's a lot more fitting to be done. This is a lot of work & definitely not the easiest thing to do,, very time consuming,, but I want it done right this time. In the top picture, you may notice more of my notes on the tranny tunnel. This was to show me where to drill the hole for the seat belt mount,, 6" down from the center of the T,, following the line downward,,, Woops! You may notice that the line doesn't line up with the new mounting area,, However,,, that's a good thing! If you look closely,,, you may see my note for the Lt side seat belt,, it was 3-4" farther back than the Rt side was,, most likely due to the last floor job. It should be good now.
The new floor pan's LF corner didn't have a shape that matched the original floor/tranny tunnel joining area,, so I had to cut it & shape it a bit,, it fits much better now. Still a bit of trimming to do in this area & along the front edge.
We made a small jig set-up out of some scrap metal so that we could match of the floor's factory strengthening ribs,,, hard to tell by the pic, but they match up really well,, another one of those small details I tend to be a stickler about,,, anyone can do a half-ass job, but I'm not anybody,,lol.

These are some sweet little clamps that are made for holding two pieces of metal together for butt welding,,, these things are great! They line up the two sides of the metal so you can lay your tack welds down,,, definitely a Must for a job like this. But before you run out and buy a bunch of these,,, do some serious price shopping! Everywhere that I see these for sale on the internet,, they sell for $29.95 for Only 4 clamps. I bought 3 sets of 8,, so at those prices I would have had to pay $180 for the 24 that I bought,, However,,, I spotted these packs of 8 clamps on the rack at Harbor Freight for only $4.95 a pack,,, so my total cost,, $15,,, Only a $165 in savings! Some times it pays to shop around.
Well, that's enough for tonight,, till next time,,,,,


