Monday, February 26, 2024

Post #70, 2-26-24, How I modified my front valance for more air flow.

1965 Mustang Restoration


  After always running on the warm side, I figured it would be helpful to increase the amount of direct air flow to my radiator. And as you can see, with the front lower valance removed, approx. 30% of the lower radiator, is finally exposed to oncoming fresh air. It's a huge amount of extra exposed radiator surface area, especially if you're running an A/C setup with an evaporator which also covers up the majority of the radiator.


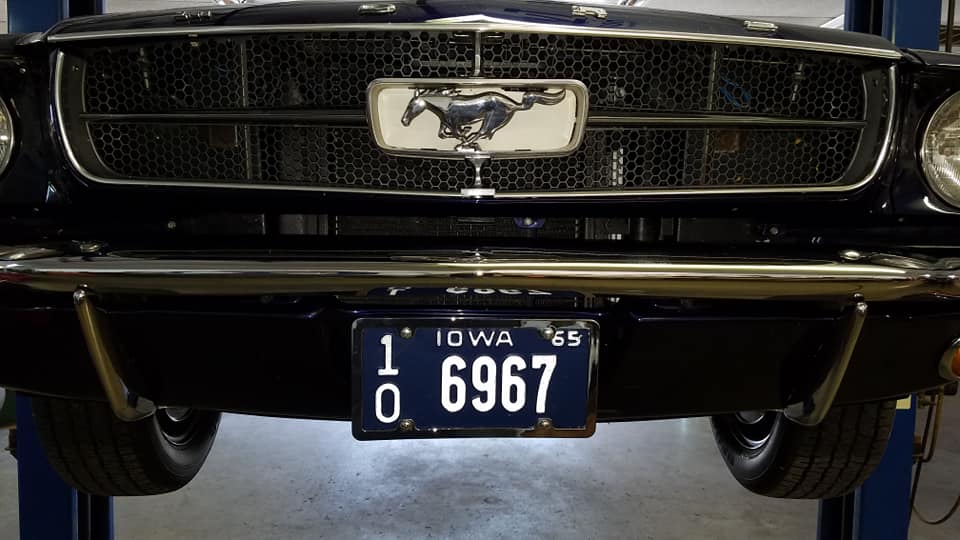
Now you have to realize, I just can't go & butcher a huge hole on my valance due to another problem I had to deal with. In Iowa, we're required to run a license plate on the front of our vehicles, so I have to still have enough room to mount one. I looked at relocating it a different spot on the front,,, but everything just looked goofy, so I decided to keep it in the middle.


Measure everything 10 times, cut with care, and vwolah,,, 


Grabbed some cardboard & made up some templates & then repeated with some metal, & finally, welded it all up. And as you can see, the radiator is still completely uncovered.


Then it was time to fab up the license plate mounts & see if everything fit, without covering the opening or dragging on the ground.


Then it was Waldo's turn to have fun & make it all pretty.


Those are the two square holes I drilled, plus an extra small hole for a rubber snubber to keep it from rattling.

On the inside of the hole, I added a flat area to the sides & bottom to be able to easily mount some screen to protect the radiator.


I think it came out all right. It definitely cools better!


Friday, February 23, 2024

Post #69, 2-23-24, Whole car build you-tube video, 7 years in 7 minutes!

 1965 Mustang Restoration


  Here's a fun video of the build,,, I call it: 

"7 Years in 7 Minutes"


  And just so you know,, everything you saw done in this video (except for the engine machine work((done by Sperry Machine Shop in Cedar Rapids, Iowa)) & the paint & bodywork) was done by me. All of the designing, metal work, engine, tranny, suspension, rear end, wiring, interior, blog, video, etc,,, all me, with a bit of help here & there from my wife & son. The guy in the video is "Waldo" my paint & body guy, who I have now worked with for over 15 years. 

  There have been upgrades since the video was made, that I am covering now on the blog,,, and a fun mod coming up in a month or so,,,, New 24" wide radiator & dual fan setup,,, and if all goes well, I'll be designing a Shaker Hood Scoop to fit this 65. 


Till then,,,,


Thursday, February 22, 2024

Post #68, 2-22-24, Installing a Dakota Digital Instrument Cluster (Dash/Speedometer), in a 1965 Mustang. (1964 & 1966)

1965 Mustang Restoration


Today's post is all about upgrading my 65's instrument cluster (speedometer). This will be the 3rd round of cluster redoing I've had, starting with my original black-faced speedo w/upgraded blue LED lights & removed oem blue diffusers. 

This was how it looked disassembled & after I had applied the white-face decals. The odometer was also reset to 00000 once the restoration was completed, since it was basically a completely new car.
 These are the blue diffusers that I removed when installing new Blue LED lights.
And here's the cluster installed in the daytime, and at night. So much easier to see & read. And the white facing also made a huge difference.

With this style of cluster, in order for my Dakota Digital Cruise Control System to work,,, this is the adapter that went between the cluster & the speedo cable.

  After a couple of years though, over the Winter time, I decided to do the major/expensive upgrade to a new Dakota Digital Instrument Cluster (about $750). When I contacted them to custom build my cluster, I told them my mileage, the color of back lighting that I preferred, and a bit more of my preferences & vehicle specs. 


  This is how the dash is advertised for day & night time, and there are many things that it can do, for both adjustability & driving preferences. I have been Extremely Happy with this upgrade!  


And this is what all shows up when it arrives. All sorts of goodies to figure out how to route & install. It's not that hard to do, but if you get stuck, just call DD & they will talk you through it.


This is the brains of the operation. The key to me, was finding an easily accessible area to mount it. And the spot that seemed like it would work the best for me,, was in the area that was formerly occupied by the speedometer cable.


So I designed a mounting plate for the brain out of cardboard. Then I built it out of thin, but sturdy aluminum. I added 2 small strips of windlace to the sides of the of the aluminum in case it rubbed on any wiring.


There's a mounting tab on both ends of the brain, I just slid the front tab into an opening I created in the bracket, and then a simple little mounting screw in the back. Super easy in & out.
It was very easy routing all of the wiring to this area. Also, this brain is designed to work perfectly with my Dakota Digital Cruise Control setup,, and I now, no longer needed that bulky speedo cable adapter that I previously had to use.
Once everything was installed, I grabbed our Garmin & when on a road test to see if I had to adjust my MPH setting,,, and the info I gave the DD tech guys must have been pretty good,,, cause I'd say I was within a half of a MPH of what Garmin was reading,,, and I did a 10 mile, mile-marker run on the highway, and it was also right on the money,,, so I called it GOOD!


Next up will be the redesign of my front lower valance for more air flow to the radiator.  Til then,,,,