Friday, April 30, 2010

Post #8, 4/30/10 Small update

65 Mustang Restoration


I've been working 10 hr days, so not a lot of time for the Stang lately,, but my boss, who is also a Mustang lover, came back & told me about the sale CJ Pony Parts was having today online,, so we logged on & purchased the rest of our sheet metal today,, along with a few other items,, gas tank and gaskets,, but mostly a bunch of sheet metal,, including a new hood for only $104.95. Hard to beat their prices, especially with the Free Shipping, on most of their items. 

Well,, I hope to get back at it this weekend when I finally have a few minutes for something other than work.

Monday, April 26, 2010

Post #7, 4/26/10 Building the Jig

65 Mustang Restoration

Well, it was time to get prepped for the weekend project,,, so Friday before work I went to Marion Iron & ordered various sizes of tubing,, from the extremely rude sketch that I drew up Thursday evening. They had it ready for me after work,,, I was shocked that it was only $69 for everything. Only 1 dilemma,, the 2 round aluminum slugs that they cut for me, didn't have holes through the center. So I found a machine shop that had a lath & they drilled the 1/2" holes for me. 


So, can you tell what it is yet, even though a couple of parts are missing?  I got a set of (4), 12" pneumatic, super heavy duty swivel casters off of Ebay,, pretty cheaply since the were demos.

We spent quite a few hours over the weekend, designing as I went, on building our new cart/jig for the mustang. The front was super easy,, the rear was quite a bit more entailed, but since it has more of a purpose other than to just hold the car up,, I knew it would be much more involved. The rear section is also designed to help me properly locate & align the new rear sections/panels as I start replacing them. Since nearly everything in the rear is to be replaced this should help out immensely,, especially with keeping everything square. 

Here's what it turned out like.


You may notice a couple of things. First of all, when I cut the rear frame sections off, it will have no effect on how the car is supported. 2nd,, with this design,,, besides the car sitting nice and low, like it is here, I can flip the legs over and raise the car up an additional 2-3 feet, which should come in pretty handy for doing underneath the floor,,, or at least that's how it's suppose to work,,, I guess we'll some time in the future. 

I have to thank the owners at Zimmerman-Houdek Credit Cars for loaning me their  handy little 110v Miller Mig Welder and Drill Press,, I couldn't have done it with out them this weekend. Thanks!


Tuesday, April 20, 2010

Post #6, 4/20/10 Stripped down to the body


65 Mustang Restoration


Well, she's stripped to the bone now! We dove into removing the rest of the parts,, RF suspension, rear end, leaf springs, brake & fuel lines, and all of those little clips and grommets. 


The bushings in the leaf springs were toast. Once we slid the rear end out of the car, you could move the leafs side to side a long ways,,, I couldn't believe the shackle bolts actually came loose. The rear end looks pretty good,,, like some work has been done to it. New PB cables, it's been cleaned up & painted,,, and the brakes look decent,, but they'll still get replaced. 


You can see it looks relatively good in the frame area,,, just a couple of small rust holes in the wheel houses,, which will also be getting replaced. 


I had a bit of time left, so I figured I'd get started on removing the cowl panel. OMG,,, I hope I didn't bite off more than I can chew. Removing the cowl section is not a tiny project,, hard to believe how much strength there is in this area. I got about half way done &called it a day.


This is a handy little tool I picked up from Mac Tools. It's a spot weld cutter, with an adjustable depth setting,, which comes in handy. The C clamp portion slips right off for those areas that you can't get to the back side of. The bits cut really nice,, the sad thing is,, is that the spot welds Ford used on this car, are huge,,, slightly bigger that the largest bit I have,,, so some chiseling is still involved. 


Sunday, April 18, 2010

Post #5, 4/18/10 Coatings & Gutted


65 Mustang Restoration


Wow what a day! Over 5 hrs of walking around a huge swap meet,,, looking for the killer mustang find. Hundreds & hundreds of sellers,, only 5 of them had mustang parts(and 2 others had total rust bucket Stangs for sale). I was actually able to get some great items from one of them,,, but most of those items I got for my boss's 65 mustang he just picked up,, like-new bars for the pony & coral,, 4 nice spinner hub caps, super clean air cleaner, an original 1965 repair manual for a buck,,, and a ton of small odds & ends. 

It wasn't a total bust though,,, at the end of the day,,, Finally, there he was, 1 of the 3 vendors I was hoping to see,,, the KBS Rep. from Perma Coatings (www.iowakbs.com  1-800-991-1043)


The KBS line of products are similar to Por-15 products,, but they offer a much larger variety & color selection,, and they are less expensive! These are some of the products I got today, with a couple of other items that are on their way,, (that's why you want to find the KBS rep at the beginning of the day). 


These products will be used to protect nearly the entire car(wherever exterior paint isn't applied),,, this car may never rust again,,, No, really! Check out their website,, a lot of good info on some killer products! ( www.iowakbs.com ) (1-800-991-1043). This is one of those improvements I was talking about!


I was also fortunate to find Van Smiley, owner of Advanced Blasting in Cedar Rapids Iowa. (319-362-0568) and talk a bit more about his upcoming part in my mustang's restoration. Once we get the car completely disassembled,,, Advanced will have the pleasure of completely blasting the entire car,, inside and out. They use a special cut glass to cut through the rust and other crap,, but doesn't harm the surface. Actually the surface has the perfect texture of the KBS products or primer,, plus it'll help to uncover all of these hidden spot welds we need to cut out for metal replacement. Hard to build anything without first taking care of the foundation,, in our case, the frame/body.


Well after all of the dreadful walking was over,, it was time to get back after it on the car. We finally got the entire inside of the car gutted out,,, some cussing was involved, followed by a few bandades!!! LOL. 


Remember the Shop manual I got today,,, it came in real handy. Don't you just love the nice job someone did on the radio hole? I know I don't,,, it looks like a lot more work to me,, just what I needed!


After that we removed the high-tech master cylinder & front lines,, this will later be changed to a better dual bowl master to help out with the new factory style front disc brakes we will be installing. This will be much better than those crappy from drum brakes. I've debated over adding power brakes,,, but I don't think so,,, I don't know maybe,,, hmmm?????


We then jacked the car up and put it on some super high jack stands (2ft),, and then started on the front suspension. We got the left front done & called it a night (11pm),,, and now I'm writing this,, it's been a long day!


I still get a kick about how small the front sway bar is (approx. 11/16"). Well hopefully more tomorrow.

Saturday, April 17, 2010

Post #4, 4/17/10 Engine Removal


65 Mustang Restoration


Now we're cooking,,, the engine is out,, and ahead of schedule. What a mess,, tranny fluid all over the floor,, thank goodness for oil dry. It would have been nice of the engineers to have installed a drain plug in the tranny pan.


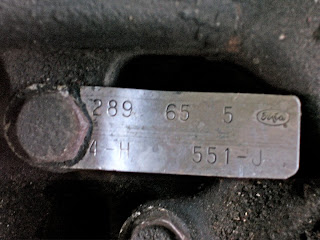
Here's the tag on the top of the intake manifold.


And for you driveshaft specialist, here's what it looked like after a round of brake clean. There are several strips on it.


The tape is centered on the front u-joint,,, 1st strip looks to be green,,, the next pair are green & orange,, and the last pair,,, I couldn't tell what color was there.


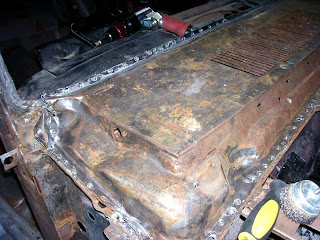
And here are a couple of pics of why I have to Redo the floor pans again,,, some people really do crappy work!!!


Well,, there's a huge swap meet in the morning across town,,, hopefully I'll find some actual mustang parts this time. If nothing else,, I will buy a bunch of tools I'll be needing. CYA

Thursday, April 15, 2010

Post #3, 4/15/10 Disassembly Continues


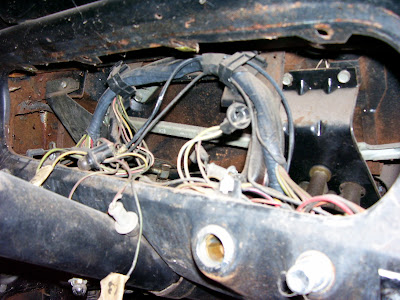
Did some odds & ends tonight,, started by finishing the removal of the harness running from the dash to the tail lights,, that was joy-joy fun. It'll be interesting when it's time to reinstall the new harness later on. Started removing some of the dash harness & where the bulkheads go though the firewall. There's sooo much to do, it's a bit overwhelming,,, hard to decide what to do next.


I decided to get some items out of my way,, so I started on the steering column. Removed the horn button, steering wheel nut,,, ran to the shop to get the puller,, and pop it was off. Like most old factory wheels,, this one is split in several locations,,, looks like another item to replace.

Note: If you're crazy enough to get into something like this project,, before you start,, go to the store and buy Several boxes of different size Zip-Lock baggies,,, a marker,, and some masking tape. Label and mark everything,,, there's like being organized,, it will definitely help you out,,, and you will lose a lot less parts. Also,, Take a bunch of pictures,, you can't have too many. Why do you think I'm posting all of these pics,,, not just to show you what I'm doing,, Mostly it's to help me remember where everything goes,, and how things are routed.


Here's what it looks like under the steering wheel,,, nice huh?  I'm not sure if the turn signal switch works or not,,, not really important since I have a new one to install. There's a tapered ring that centers the center shaft with the bearing in the housing, you can kind of see it on the shaft(looks like a snap ring). It came out easy,, but it surprised me to see that it has an opening(split),,, since this is my first one of these,, I'm a bit curious if it's suppose to be like that,, or do I need a new one,, anyone know?


The 2 nuts on the right,,, and the bracket for the parking brake cable was next(angled cable,, 2 screws/bracket). When inside and removed the other 2 screws holding the PB handle assembly in place. It took me a few moments to figure out remove the cable from the handle,, it's pretty slick once you figure it out(my eye sight isn't very good up close & in dark places).  

I then removed the brake pedal,, steering column seal(that was toast),, and a few other items. I get a kick out of the steering shaft,,, you can see that the column is removed,, but the steering shaft remains. It actually is attached inside of the steering box/sector and the other end hold the steering wheel on it,, pretty cool,,, definitely screws up any idea of installing a tilt wheel though,, unless you use a short shaft sector out of a slightly newer mustang. Maybe next time,,, since I just had the guys at Chockostang Classis Mustang Parts (in Illinois,, 217-882-2083) do a total rebuild on a spare sector I had,, boy it looks and feels nice!


Wednesday, April 14, 2010

Post #2, 4/14/10 Window & Headliner Removal


 65 Mustang Restoration

Didn't have a whole lot of time today, but we did manage to remove the front windshield. It was actually a pretty easy & simple process. Since we'll be replacing the rubber seals anyway,, I bought a knife that you can really extend the blade on, and simply made 3 or 4 passes with it in each area of the seal and was able to remove the top half of the rubber. Since it was still a bit on the stuck side, I just ran the blade Carefully along the edge along the top & 1 side and slowly pushed on it & presto, it came out. We had previously already removed the rear window in the same fashion. It really helped having a knife with a somewhat flexible blade on it. 


We're planing on getting this car Completely bead blasted once everything is off of it,, so to make things waaaay easier for the blasting company to do a good job,,, we tried to clean up as much of the old rubber/glue as much as possible with a putty knife & a wire wheel in the drill. That helped a bunch. 


The lower lip, where the rear window rests upon, actually looks pretty good,, hardly any rust at all. I've debated on whether or not to replace this section,, and I'm still not sure,,, I guess we'll see what it looks like after we get it back from being blasted. 

At the same time we were cleaning the window sills,,, we were also removing the old headliner material that was glued onto those top window ledges. I had my son(Brent) remove all of the items attached to the headliner(hooks, visors, etc) and remove the headliner while I was running an errand. NOTE TO SELF,,, even though he placed all of the small parts in a zip-lock bag & marked it(as instructed),,, I forgot to mention to him to pay attention in which holes he removed the headliner bows,,, and in what order they came out of the headliner. Three of them look the same, but that 4th one is definitely longer. When I took the pic where the headliner was,,, I noticed tiny little arrows pointing at some of the holes up top,, I'm assuming that the bows go in them,, but you know what they say about assuming. 


When we started to first remove the headliner,,, I was a bit puzzled by it, because it's white,,, and according to the date plate, the car came with a standard black interior. I know all of the other old interior pieces that came with the car were black,, just seemed a bit odd that the headliner wasn't also black. I guess I was planning on installing a new black one when the time arrives,, unless someone comes up with a Great reason I should go back with a white one. I was also a bit bummed out that this car didn't come factory with a dome light up in the middle of the roof. I sure wish it would have. I've debated on installing one,,, but don't have any idea how to route the wiring,,, and will there be an appropriate place to plug it into the new wiring harnesses that I'll be buying. 

Here's one thing I do ask of any of you that may be reading this blog,,, if you have info we can use,, or good constructive criticism,, by all means, feel free to share it with us,,, I'm always willing to learn & open to suggestions. 

Thanks in advance. 
Doug/Brent

Monday, April 12, 2010

Post #1, 4/12/10 Picked up the new project.


65  Mustang Restoration

I hope everyone will bare with me here,,, I'm new to the blogging scene, but I figured I'd give it a try for this project. I welcome everyone to join us in our little adventure,,, I will probably be requiring some of your help with some of the details. One of you may even be the lucky new owner of this car when it's done,, because most likely, it will be for sale once completed,,, since neither my son or me fits into the car very well (our heads slightly touch the head liner)(may have to correct that situation). If you'd like,, make sure to tell your friends about this blog.

Over the next year or so, depending on time and funds,
my son & I are hoping to do a total restoration of this car,,, hopefully it'll be better than it was when it was new. Though there are a lot of things we could do to hot-rod it up,,, this will be built back to close to factory specs. However, being a mechanic/fabricator/chassis builder/racer for the last 30 years, and with all of the improvements in technology since this car was first built, it's hard for me to build a car like this without improving certain areas. To 90% + of the people that look at this car,,, it'll look completely stock,,, since most of the improvements will be very subtle or hidden from view,, only the hardcore Stangers will notice certain areas right away. I guess I'll just have to start a New Mustang Classification called "Factory Stock Enhanced".

Here's the 65 Mustang that I recently picked up by Kansas City(735 miles, round trip). You may have noticed that it's going to need a bit of work. It was just what we were looking for. Most of the parts came with the car,, but I had to load them into the trailer, back of the truck, back seat of the truck, and into what was left of the Stang's trunk.


Though it's hard to see,,, this car actually has very little rust on it,, mostly the lower quarters, LR frame rail, lower wheel houses, a bit on the trunk floors, and slight amounts in the battery box area. One of the nice things about this car is that most of the dis-assembly of this car has already been completed & it's previously been blasted in most areas.


I've spent most of the winter searching for manuals,, and many parts new & used, on Ebay, Craigs List, at auctions, swap meets(another one this weekend), and by word of mouth,, and have accumulated several items. It can save you a fortune when you're patient,, sometimes you just have to pick & choose when the right time is to get something. For example, CJ Pony had a special this winter,, Free Shipping on ALL of their items,,, this even Included Truck Freight Shipping on all of the large parts,, so I bought (2) new floor pans, (2) full quarter panels, (2) front fenders, radiator support, front & rear valance panels, and a couple of other items. Since they're in Pennsylvania and I'm in Iowa, this saved me several hundreds of $$ in shipping which can be used for other items. Since that time,, they now offer Free Shipping on all of their items that don't have to be shipped by truck,,, which is fine with me, because we have all of our large parts.


We spent last Saturday cleaning up the garage,, it's amazing how big of a catch-all a hollowed out Mustang can become over the winter. Space is a bit limited,,, but it's what we have,, so we'll deal with it somehow. Here are some more pics of what we're starting with.


That should kind of give you an idea where we're starting from,, hopefully I be back tomorrow after we get back from testing at the track. CYA