Wednesday, May 26, 2010

Post #14, 5/26/10 Back from the Blaster


 65 Mustang Restoration

Finally!  We went and picked up the Mustang from Advanced Blasting, and boy did it come out nice! Those guys did an Awesome Job! The majority of the car was shot with sand,,, while the more sensitive areas (top & underside of the roof, deck lid, dash, and rear window panel) were shot with glass to keep those areas from warping. The surface looks to be perfect for all of the repair work that we will be doing,,, followed by the special coatings that will be applied to most of the surfaces that tend to rust so easily. Here are a couple of pics of how she looks.


Isn't that sweet looking? I don't think we'll have any problems getting primer, or coatings to stick to those surfaces. I love the engine bay,,, that should come out great once it's coated.

Now that you've seen the positive side to having your vehicle blasted,,, let's now take a look at the "Bummer" side. The sad & bad part about removing all of that rust is,,, once it's gone, so is the metal that it use to be. It was amazing how thin the metal actually was in a couple of areas, and now that the rust is gone, several new areas that will need to be repaired, have revealed themselves. 

When I 1st saw the bad floor pan replacement job, I had decided then & there that I was going to replace them again,, but only because they were poorly installed. But after they were barely blasted, now I have even more of an excuse to replace them.


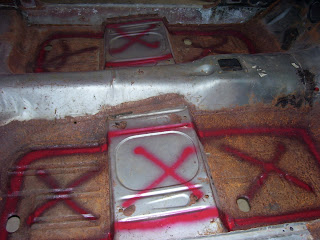
This is the passenger side front floor pan(top of the picture is the tranny tunnel),,, as you can see, not to good any more,, good thing I have new ones,,, but it's going to be a lot of work to replace them.

 And here's the rear window panel, bottom side. I thought it looked pretty decent,,, but that was before. Luckily they're available aftermarket,, and for only around $38. I haven't decided yet whether to fix the two spots,, or spend several hours cutting the old one out & praying that the new one will actually fit.


Also, the rear floor extensions will be needing some repair,, I'll know more of their condition once the wheelhouses are removed. The driver's side isn't nearly as bad looking as the passenger side, which looks like it'll need replacing.


Look how sad the wheelhouse looks after hardly even being touched with the blaster,,, it sure didn't look that bad before! 

One nice thing about putting all of the new pieces on,,,, we'll be able to coat each one separately as we assemble the car,, and will probably apply a 2nd sealing coat to the joints(as best we can) once the panels are welded back together. 

The new spot welder should be arriving soon,,, and according to what I've seen, on how & how well it works,,, a lot of the panels will look like they were done at the factory,,, or at least that's what we're shooting for. 

It may be a while before I can get hard at it,, several graduations to deal with over the next couple of weeks,,, after that, it'll be time to rock. At least in the mean time it'll give me a chance to get a couple more items put on order,, yippee!

Thursday, May 20, 2010

Post #13, 5/20/10 small update

65 Mustang Restoration


Well,, I finally got the car hauled over to Advanced Blasting,,, now it's up to them.  While talking with the owner,, we discussed using sand for the majority of the car,,, and glass for the the panels that are more sensitive(roof, deck lid, dash).  They have quite the operation where they're at. They showed me a couple of other projects that they were doing for other restorers, including an old (40's?) truck cab. I hope ours comes out that nice. They enjoyed how nice and easy it was to roll the car around on the jig I made. 

I should be getting it back shortly,, then the real excitement starts,,, of coarse that's all dependent on if everything to do with "Graduations" is over with,,, then, maybe,,,, I can tear into it hard & heavy,, at least until the next "situation" arises, whatever that may be.

Thursday, May 13, 2010

Post #12, 5/13/10 small update

 65 mustang Restoration

No, I didn't stop working on the stang yet,,, I'm still waiting on the weather,,, nearly 2 full weeks of rain. I need some dry sunny days to be able to transport the car in. Plus the blaster has another old classic, that is already there, which is also waiting for the weather so it can be done. 


So,,, I guess it's just a waiting game,,, we may have to start in on the small parts this weekend. Cya Soon.

Thursday, May 6, 2010

Post #11, 5/6/10 Body panels arrived today


65 Mustang Restoration


I've been waiting for the forecaster to give the good news of the rain staying away for more than a day. I'd hate to blast the car, only for it to get wet on the way home,,, I even have a humidifier for the garage,, maybe it'll help.  I did have another round of Christmas today though,, my large order came in from CJ Pony Parts.


One really big box full of goodies,,, with One, Very important sticker that you need to read before you unload the box from the semi,,, telling the buyer, ("me") to make sure to check the shipment for damage before signing for it. OOPPPS!  Heck, by the time I saw that sticker, the Fed Ex driver was half way back to wherever he came from. Luckily all of the items looked to be in good condition.


Most of the items are for the metal work that will be started on sometime soon,, I hope. Most of the parts look like nice items,,, only a couple of the items,,, are,, can I say, in need of attention. The front, rt side, rear inner fender panel(piece the hood hinge bolts to),,, isn't punched out for the fender bolts/clips,,, fortunately I only need it for patching up the original ford panel,,, I'd hate to have to replace the factory one since it still has the matching vin # stamped on it.


I was a bit disappointed that the bushing sleeves in the rear frame rails weren't welded in, but half way,,, that's pretty shabby. Too bad some suppliers don't take more pride in their parts(not blaming CJ Pony Parts for this at all). Luckily I can weld,,,, dang I hate half-ass workmanship.

The Dynacorn hood looks beautifull,,, extremely nice,, hope it fits!  


Also included was a nice new fuel tank & parts to make it work. Battery tray, trunk floor panels, rear cross brace, bumper brackets, 2 inner wheel houses(2 outers on BO),,, and then there's the awesome new Cowl which they were smart enough to ship in 2 pieces.


(Above) Top side of both panels of the cowl.


Bottom side of both panels of the cowl. 

I was super glad to find out that the cowl would be in 2 sections. Since the cowl is responsible for rotting out more floors than anything else on the car,,, if there's one area that I wanted to really be able to apply the special KBS Coatings to,,, it would be the lower cowl panel.  I was worried that I wasn't going to be able to if the cowl was pre-assembled.  


Well, I guess if we can't work on the car itself,,, we'll get started on cleaning the hundreds of other items,,, Crap there's a lot to do!


Sunday, May 2, 2010

Post #10, 5/2/10 Prepping the body for blasting

65 Mustang Restoration


We started today by doing the wonderful job of scraping off most of the seam sealer from many of the joints that are to be blasted,,, Wow,, how much fun can you have? It's a long & tedious job,,, but it makes the "Blaster's" job much easier,, therefore saves us money. There's not many things harder to blast than rubbery goo, caked on grease or undercoat,, the blasting media just seems to bounce right off of it.


There were a lot of hidden areas that need cleaned out,, some harder to get to than others. Once that was done,, it was round 17 for the vacuum cleaner.


Next, we moved to the outside of the car & removed a couple of small patches of old bondo. I soon found out, that it's not easy to grind out the lead filler that was originally used to fill the seam where the roof & the quarter panel are hooked together,,, I just couldn't tell what I was grinding,, metal or filler. So I got the old Map Gas torch out and was able to melt the lead right out,,, at least good enough to see the spot welds that we'll be drilling out in the near future.


It actually comes out quite easily using this method, but you still have to take precautions for it popping & possible spatter. I was surprised how much was in the seam, as seen on the floor. You don't want to hold the torch in one place for too long though,, we don't need any extra warpage. 

And here's what it looked like once we were done. Once we had the majority of the lead out,, starting at one end, we re-heated the area and in one direction, we used a wire brush to remove the rest of as much of the lead as possible. It turned out pretty well, considering it was my first time messing with lead filler.

Finally for the day,,, I sprayed certain areas of the car with red paint,, I think, 50 year old cans of red paint,, pitiful stuff. The areas I sprayed, are areas that the Blaster's don't have to worry about blasting, since those panels are to be replaced anyway,, once again, saving us money. As long as all of those seams I have to drill spot welds out of are good an clean,,, that's what I'm looking forward to.


If this car comes out like the sample of blasting work that was on display by Advanced Blasting,,, I'll be super excited. Now I just have to figure out when I'm going to be able to get the car to Advanced Blasting so they can do their thing,,, soon I hope.

Post #9, 5/2/10 Cowl, Quarter & Dash removal

65 Mustang Restoration


Well I decided to finish tackling the removal of the cowl section. My killer spot weld remover is nice in certain areas, but won't work in all places,,, and the spot welds that ford used on this car are really big,, so this week I picked up a different style of bit that you use in a regular drill, one that is a pretty large diameter bit,,, boy did it work well,, much better. I also bought a spot weld chisel that also made a big difference at getting the panels apart. 


I guess I didn't realize what a big job this was going to be,, very time consuming, but once it was removed, thank goodness I decided to do it. It's totally rotted out in areas underneath,, right where they say they are prone to rotting out. Good thing I ordered a new one earlier this week!


 The sad thing is,, this is a California car that spent most of it's life in California. They say that those rotted areas on the cowl are the most common reason for the floor boards rotting out in Mustangs. Water runs out of the holes and down into the carpet,, and the lovely underlayment (nasty stuff under the carpet) acts like a sponge, and eventually rots out the floor boards,, something we will be rectifying on this car.

Once the cowl was out, it was time to clean up all of those sharp edges. Spot weld removing is something that definitely takes time to learn how to do properly without screwing up the metal that you want to reuse,,, however, one nice thing about steel,,, even if you mess it up, like I did in a couple of areas,, it's easy to repair. And with all of the years I have fabricating with metal,, I definitely know how to work with steel & sheet metal.


Next, we moved on to the removal of the right rear quarter panel,, or at least the majority of it. Since we are going to have the car blasted, and since the quarters are going to be replaced anyway,, we cut a large section of the skin off so it would be much easier for the blasting company to get into more of those hidden areas that they normally wouldn't be able to get to. 

Before:

After:


Nice rust huh?  Now the blasters will be able to do a much better job,, and since it's easier to do, it'll take less time,, therefore saving us money on the job. It's also a bit easier for you to see why we'll be replacing the rear floor panels & wheel houses,, just too much rust & too many holes.


Now do you see why we're replacing everything,, like these quarter panels? That is some quality workmanship right there! NOT! I had to laugh at how sad of a job someone did,,, but you see stuff like this all of the time,,, people just don't take pride in their workmanship. Whatever it takes to get by,,, most likely by the person who was selling the car to the next unsuspecting owner. This tiny little section had to weigh almost 10 pounds.


Next it was back to the front cowl/dash area.


Even with just the removal of the cowl section, you can see how much easier it would have been for the blasters to have gotten to the normally hidden, back-side of the dash. However,,, if you look closely, you'll see that some ya-hoo did a fantastic job of totally screwing up the radio area of the dash. The guy I got this from, included a radio repair panel, when I picked up the car,,, but my goodness,, talk about something that fits like total crap,, Not even close to fitting. So,, since we're already this close,, and there's only about 15 more spot welds to remove,, what the hay,,, out came the dash. Now I just have to fine a decent one,,, news ones are almost $400 shipped,, just too expensive,,, but I have a lead on a couple of real nice used ones that aren't all messed up like ours was.


The removal of the dash does have it's benefits. Look how much room there is for the blasters to get to the firewall,,, and this does give me a lot more room when it comes time the replace those messed up floor pans. Look how nice those so-called new floor pans look,,, really a sad job,,, and it's going to take a lot of work to properly repair/replace them. It would have almost been easier to have gotten on of those huge all-in-one floor sections,,, but they are to short up front,, and I would have had to replaced even more metal,, with the pans I have already purchased,, they should work very well,,, hopefully.

I wonder about a couple of holes in the firewall,, one above the blower motor, and the right round hole above the rectangular hole(by the master area.) Anyone know for sure?


 I'm thinking these 2 holes need filling.