65 Mustang Restoration
This weekend I was finally able to convert the hood spring setup into a prop rod setup. After trying a couple of sets of hood hinges, including a new set, and spending a bunch of time trying to get the back of the hood to sit properly when I shut it, the back of the hood constantly wanted to rise up in the back, when either new or old hood springs were installed on the hinges. But when I would remove the springs, the hood would sit perfectly like it should, so for that reason and the fact that I like to be a bit different from everyone else, I decided to convert the car to a hood prop setup, which ended up working out very well.
I had originally ordered a Scott Drake Prop Rod for a 65 Mustang, which after receiving it & trying to figure out how I could actually mount it & get it to fit properly,,, I decided against using it and went on the search for a better design to use. I ended up ordering a prop rod for an 1986 Mustang instead, and ended up installing it in a totally different way than how it was designed for.
I got a set of prop rod clips from the local auto parts store (above), and ended up using the lower right, white one in the picture. The nice thing about this clip is that it's very easy to get & replace it it happens to brake.
I started by trimming the little tab off of the mounting clip & clamped it right to the lip of the front fender right in front of the radiator support(sliding it all the way against the vertical ledge of the fender to help keep it from twisting).
I then installed some green tape onto the rod in several places so that I could mark the areas where I wanted to put a small bend into the rod so it would clear everything, fit nicely, and not rattle against anything.
I really like the double lip on the hood end of the rod because it acts as both a resting ledge and a hook that will also grab the hood just in case there's a large gust of wind,, something the 65's prop rod didn't have,, it was just a straight end that only kind-of supported the hood, but was worthless in case of wind or even being accidentally bumped. The tape on the rad support was to help mark where the rod clip was to be installed. For the clip I used, it require a somewhat square hole,, so before I just started drilling, I practiced making holes on an old piece of metal,,, I'm glad I did, because it took quite a few tries to get it right.
The finished rod came out very nice, and almost looks like it was suppose to be there.
The hood preparation was very simple & fast to do, using one of the existing factory holes. You can see on these 2 pics what little had to be done to the hole.
And here's what it looks like with the prop rod in it's new resting area.
And with the hood closed, you can see that it's a somewhat tight fit, but it actually fits very nicely. The only thing I'm still debating on, is whether or not I want to coat the hood end of the rod with the black rubber-like goo that you use to coat tool handles with,,, just not sure since the polished stainless steel rod looks pretty good.
Next up, was to modify the hood hinges to look like they were never designed to have springs on them.
Time to remove the brackets that hold the springs.
I used tape to lay out where not to cut,,, and then cut off the rest and did a light bit of sanding to finish them off.
And here's what they look like once they were completely finished, including getting a coat of Eastwood's Zinc Phosphate paint, which covers very nicely & colors them with an OEM metallic charcoal grey color. I think they came out very nicely.
I was also able to get a bunch more of the body alignment "tweeking" done,, something that has to be done before we start on the body work. One of the bigger items to do, was to redo the tabs on the top-front of each of the two doors. While previously trying to line up all four corners of the doors with their mating panels,, reguardless how hard you I tried,, there was just no way that the new doors were ever going to line up properly,,, Without physically twisting them,, and when I did I heard a couple of snaps, which ended up being the tiny spot welds breaking loose on these tabs.
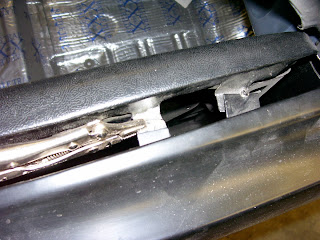
So once the door was twisted for the final time,,, and triple checking it, since the tabs had also twisted from my actions, I was able twist the rear one back into shape since the weld was broken(front one was still intact). Once it was reshaped, I carefully ground off the black primer coating, clamped it into place (constantly rechecking the door alignment), and then welded it back together with good welds that'll actually hold. Once the rear tabs were done, I cut the weld on the front tabs, straightened them, ground them, & then welded them back properly. (Then did the driver's door).
The doors seem much more solid now, but when I remove them to do the body work on them, I plan to add several more small tack welds to where the outer skin attaches to the inner panel for even more strength.
Wonder what next week will bring,,,,


