65 Mustang Restoration
Alright,,, it's finally time for the good stuff! The engine & transmission are the heart of the car, without it, your rear is parked on the couch, munching on chips & watching the tube.

The Machine Work done by:
Sperry Engines
Cedar Rapids, Iowa
It all starts with the machine work & the blue printing of it's parts. I pretty much knew what I wanted from this engine,,, horsepower is great,, but I mainly wanted longevity, reliability, a super light rotating assembly, and to be able to get over 20+ mpg,,, all while still sporting that sweet performance sounding idle & 350 horsepower.
Sperry & I discussed which combo should do pretty much all of those things,,, starting with upgrading from the old 289 up to a slightly newer 302 roller cam block & adding a 331 Eagle rotating assembly(rods & crank), and some super light Mahle forged pistons. The heads would be upgraded to Edelbrock E-Street Aluminum Heads & topped with a Edelbrock RPM Air Gap intake manifold.

I about fell over when I went to pick up these parts cause Sperry said my "Book" for the engine was in his office,,(????). When he brought it to me, I was amazed at all that was included in it,,, like all of these(and more) pictures that they took of my engine going through all of the processes. Also included in the book was every spec on every part of this engine, ring gaps, bearing clearances, the weight of all parts, etc,,,
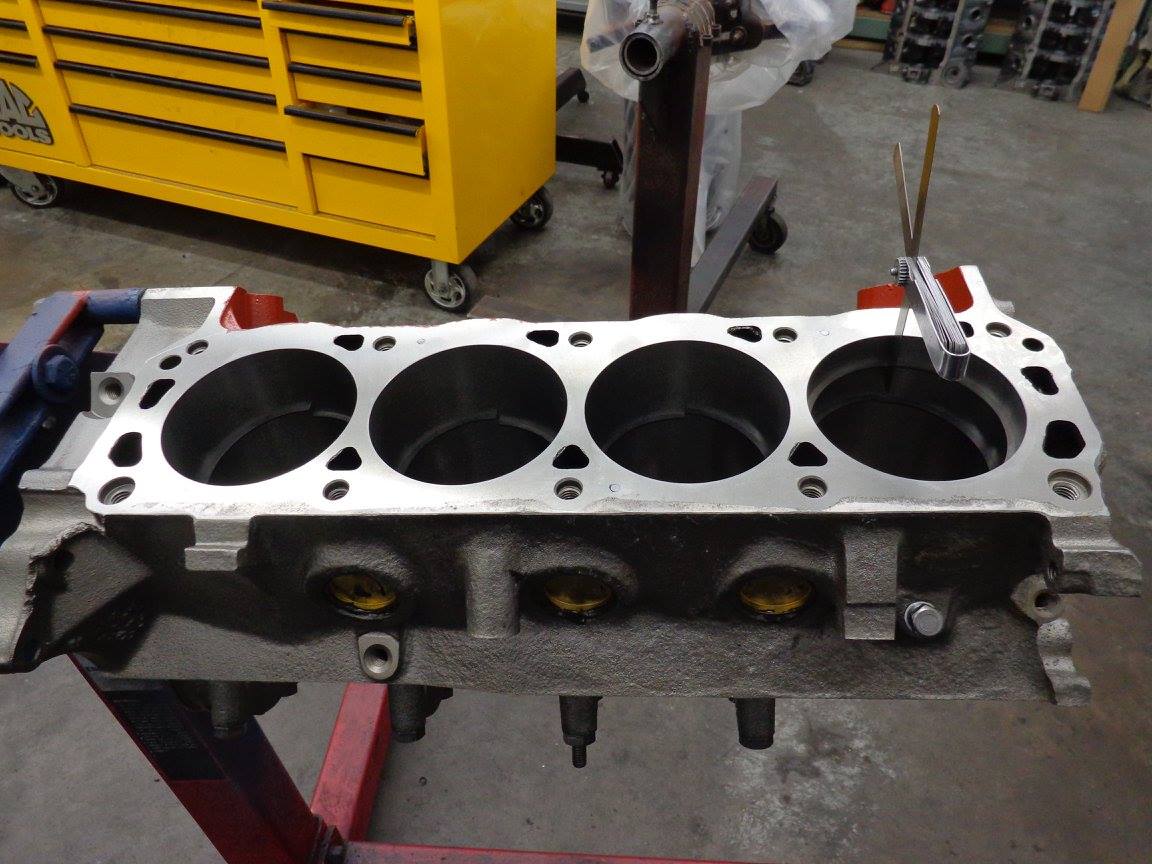
Below are several of the pictures. After being cleaned, magnafluxed and line honed, the block was bored, decked & honed with a deck plate.


Here are the rings all being file fitted for each cylinder.
Here the block is getting coated for better oil drainage.


Above, since the pistons are so light, the counterweights on the crankshaft were all machined down, which made the rotating weight even less. Below, the crank is being balanced.

Finished!


Here are the super light Mahle pistons with
coated skirts & Eagle Cap-Screw Rods.


I have built over 100 engines & planned on assembling this short block, but Sperry talked me into letting him assemble it since he need to check all of the clearances,,,, Best $200 I ever spent!

This ought to work!

And we can't forget about the heads. Even though New Edelbrock E-Street Aluminum Heads come (supposedly) "all ready to go" Sperry went through them anyway. Redoing the surface, upgrading the valve job, and installing better Comp Cam valve springs suited for my camshaft,, all included in the price of the heads.


Don't forget the not so fun part,,

Now for the fun part!

After installing the Comp Cam, timing chain, and from cover, I taped up the engine and coated it with Eastwood's 2K Aerospray High Temp Engine Paint and let it dry,,, Nice Paint!

After it was dry, it was time to assemble all of the new parts,,, the high volume oil pump, ARP oil pump drive(shaft), windage tray, harmonic balancer, and Boss 302 oil pan & pickup.


Then I added the new Edelbrock water pump, fuel pump block-off, Edelbrock E-Street heads, 7/16" screw-in studs, guide plates, Comp Cams push rods, and a set of 1.6 Roller Rocker arms.


I topped it off with an Edelbrock RPM Air Gap intake manifold along with a 1" thick tapered spacer, and vintage style tall valve covers.

Mock-up Time!

I found out many years ago, if you don't completely mock up your engine & accessories,,, that you're goofy!
There's NO BETTER TIME to make sure everything fits, lines up, or that you have the right bolts, belts, etc,,,,. I can't even begin to tell you how many HOURS I have getting everything to what I call acceptable! When the engine is on a stand like this, it allows you to see everything, things you would have an Extremely hard time seeing/finding while mounted in the car.


These parts include: Stainless Tri-Y Headers, Petronix Billet Distributor w/hei style of cap & Coil, Performance Distributor Wires, Sanden A/C compressor, 75 amp Autolite Alternator, rebuilt power steering pump, Gates belts, and a new Fitech EFI unit on top.


Why a Fitech System??? Remember that goal of over 20+ mpg,,, imagine going on a 3-5k road trip with elevations ranging from approximately 800 - 8,000 feet. The computer will automatically & constantly adjust the fuel mixture to the perfect ratio that I set it to. This system is also about half the price as others, and it doesn't have a huge/ugly harness with a remote computer that has to be mounted wherever,,, since the computer in built into the main unit on this one.


This model will handle up to 600hp.

------------------------------------------------------------------------------------
The AOD Tranmission Rebuild

First, find a dirty old tranny. I located a nice AOD transmission out of a 92 Mustang Gt with only 45K miles on it. But even though it had low mileage on it, I believe in being thorough since I don't want any surprises. I was glad I did once I got into it.


Some of the innards, and let's get organized.


I also upgraded the pan to a super nice heavy duty finned aluminum pan. For only $130(ebay) I get a pan that strengthens the case, won't leak like a crappy tin factory pan, it holds more fluid & has cooling fins on it,, seems pretty smart & like a win-win situation to me.

I cleaned the crap out of the case after I got is disassembled, and once it was super clean, I coated it with Eastwood's Brake Grey. The inside was then completely rebuilt with higher grade clutches & steels, seals & a pretty sweet(highly involved) shift kit. The Shift levers & linkage were also upgraded to fit the 65.


I also did a major upgrade on the torque converter. I hated the idea of a worthless and bulky over-weight factory 12" converter,,, basically a ton of extra rotating weight that is of no advantage to anyone. You know how they say "the best of both worlds" the converter I found fits the bill. It is a 10" 2,800-3,200 stall converter which will work very well with my cam especially stoplight-to-stoplight in the city,,, and on AOD's like this one,, once the overdrive kicks in on the highway, the converter "locks up" which means no slippage (like a clutch).
Roadrunner Torque Converters offered a reasonably priced 10" converter that only weighs in at 21 lbs. which I'm told is approx 15-20 lbs. lighter, which will make a huge difference,,, considering that all 21 lbs. of the new converter are so much closer to the rotating centerline. 20 lbs. of this type of lost weight, is like removing 300lbs from the car(which they say is like 3 tenths in the 1/4 mile).
Look how tiny it is.

Let's put it in!

I was hoping the tranny would fit. Notice the heavy huty crossmember,,, once the engine was in, I added a 1/8" thick body washer to the mounts to raise the engine a tick for pan clearance.


Yeah Baby,, it's in!


Once they were in I started to get everything else fitted & redesigned.

In order to get the power steering cylinder to fit properly when running headers, I had bought the extended bracket that bolts to the frame, but that didn't do anything for the end that was attached to the centerlink. I couldn't even turn the wheels half way, one direction without the cylinder hitting,,, so I redesigned the centerlink(below) using the mounting hole portion off of an old centerlink I had. It took a bit, but it works perfectly & it's very strong. It may be a bit goofy looking, but the cylinder now sits level and has plenty of clearance.


The HD crossmember caused me to reroute the PS lines to go underneath rather than over it. (like in later models) it actually works pretty well that way.

I have also upgraded to a big front swaybar,,, which again requires more modifications to the frame,,, basically you notch the crap out of it & then re-weld it up,,, not too difficult, just more time & paint,, but at least it works properly now.


And here it is,, pretty much as it was when I put it into hibernation this last Fall. Thanks goodness for that Mock-up session!

And No, my air cleaner doesn't fit,,,,, Yet!

And though I didn't have it then,, I now have the new aluminum driveshaft just waiting for the 65's return.

Til next time,,,,

Congratulations, excellent post and excellent restoration process, nice job..!! enjoy your car.! Salvage cars
ReplyDeleteThank you!
ReplyDelete