Sunday, November 21, 2010

Post #31 11/21/10 RR Wheelhouse Install

65 Mustang Restoration

Though a lot of work was done, there's not a ton of progress to report on. First we installed the RR wheelhouse, which actually wasn't too bad,, more time consuming than difficult. Since the wheelhouses are such an important structural feature on the car, you definitely want to make sure things are going to line up properly. We grabbed the rr trunk floor sheet metal just to double check the fit,, and to go one step further,, we cut the bottom half of an old gas tank off and then screwed the upper half onto the existing panels that are still factory pieces,,, which then helped to line up the new rr trunk floor(which was then clamped into place),,,, which in turn helped to properly line up the wheelhouse.  Seems like a lot of extra work, but it'll sure help with the alignment of all of the other parts of the rear section of the car.


It's amazing how much strength the wheelhouses have,, so even though they're a super pain in the rear to do,,, if you have a questionable wheelhouse(very rusty or super thin feeling),, don't dink around,,, just replace it,, it's just to important of a part, not to.

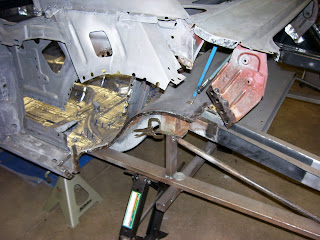
Next it was time to move over the the LR frame rail & wheelhouse. Wheelhouses are really a pain to remove,,, but we must be getting better at it, because this one only took us half the time remove. It helps a bunch when you're able to remove most of the frame rail during the process,, big time saver.


Luckily, there seems to be a lot Less rust on the left side,,, so repairing the sheet metal shouldn't take quite as long. Most of the prep work to the metal has already been done, with just a little bit left to go before we're able to install this new wheelhouse. We also have the new LR frame rail all fitted into place with only a couple of things to do to it before it's final installation.


I guess it was lucky that we decide to see how well the rear cross member fit up to the back of the frame rails,,, because it doesn't fit very well at all,,, unusable as far as I'm concerned. The main & overall shape of the rail was fine,, the problem is, that it's not tall enough,, approximately 1/4"-3/8" from lining up with the top of the frame rails,, not good!  I'm sure I could butcher it up and make it fit, like many others have done in the past,, but that won't happen on this car. Sounds like some extra Phone Time come Monday morning.

Hopefully we can get a good one by next weekend,,, may be hard though, with turkey day this week. If nothing else,, Happy Thanksgiving!

Saturday, November 20, 2010

Post #30 11/20/10 New Rear Frame Mods & Install

65 Mustang Restoration

We started tonight with most of the small little sections of metal that needed repairing,,, most of which were easily welded up & then ground back into shape. Then will prepped & modified the two rear frame rails. When you receive them, they look like the manufacturer only did the bare minimum to get them out the door,, which leaves them pretty flimsy. 


These are a couple of before & after pics of the welding that we did to the frame rails to strengthen them up a lot. We welded on them as much as space would allow, inside & out. During this process we also drilled holes & added the spacer tubes that will support the rear dual exhaust hangers, which were unfortunately, not done by the manufacturer. If you're replacing your rails, now is definitely the to do this step, because it will be impossible to do once they're installed,, even if you don't plan on using the holes now, you may want to sometime in the future. After all of the welding was completed, Brent re-blasted them and prepped them for the Rust Encapsulator treatment that they'll receive once they're installed.


Next, we installed the new RR frame rail,, I have to say,,, the jig worked out Great! I was amazed at how easily everything went together,,, just perfect. Once it was welded into place & the welds were smoothed down, we taped off the edges(for future welding purposes), coated the inside of the rail so it could dry over night, and called it a night.

Hopefully, the rest of the weekend build goes as easily as it did tonight,,,


Thursday, November 18, 2010

Post #29 11/18/10 Rear Section Complete Removal

65 Mustang Restoration

Yea Haw,,, tonight we finally started to prep the car for the most complicated part(I hope) of the whole restoration,,, doing the whole rear section of sheet metal & frame sections on the car. I have been very worried about tackling this portion of the build,, mainly because there are so many things that have to be perfect in order for everything to line up properly. 


 We started by removing the rear wheel sections of the jig we built and setting the car on 4 nice heavy duty jack stands, trying to keep it as level as possible. And since the bottom of the car is already done, we placed some nice pieces of 2x6's between the stands & the frame rails. We then use a couple of scissor jacks to help hold the rear jig in place,, with very light pressure. 


Next I took a bit of old scrap 1/2" square tubing and fabbed up a temporary rear support & tacked it in place,, this is to help support and keep everything in place while we cut some of the main supports for the roof.


 We then proceeded to cut a large section of the rear of the car off in one large piece. This will be used for measuring purposes in the near future,, and you never know if there's a small bracket you might need still on it somewhere. Never throw anything away until you're absolutely sure there is absolutely nothing else left on it that you might need!


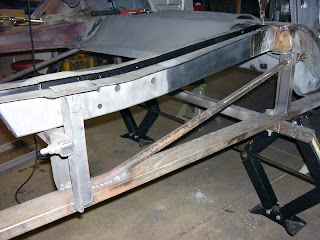
 This is a picture of how the aluminum spacer fits into the rear of the frame rail,, very important when it comes to lining up the new rear frame rail section that has to be installed. It just slips into the bushing sleeve and is held in place by two supports arms that are welded to the jig.


Here's what the jig looks like without the sheet metal on it. It's very solid and seemed to work perfectly(so far), because when I cut through the frame rail,, it barely moved & stayed right in place. The next step is to start prepping all of the metal surfaces and cleaning out the rear frame sections so we can get the insides of the frame rails coated so help prevent any further rusting. 


 Brent has already been busy glass beading parts. Though the new rear aftermarket frame sections are nice,,, I still plan on doing a bit more welding on them to make everything stronger. 

This is going to be a huge project,,, I sure hope we're up to it!

Till next time,,,,

Monday, November 15, 2010

Post #28 11/15/10 Export Brace "Plate" install, Floor bottomside

65 Mustang Restoration

Once the cowl installation was completed, we spent several hours doing a bunch of touch-up grinding & sanding all over the car. The next item that we went to tackle was seeing how well the doors were going to fit & line up,, but when we dug them out of the shed, we found that the right side door, (which had previously been badly re-skinned by someone in the past), also had several small rusted through holes on the bottom of the inner shell. That isn't a place that you can repair due to the textured finish that is has, which is visible to everyone when it's installed,, plus, it was tweaked pretty badly.

Then we checked out the left door,, no rust, but unfortunately it had several dents on the inner shell,,, once again basically making it scrap metal. So I jumped online to see who had a killer deal on new door shells,,, and once again I guess I lucked out, because CJ Pony was having a 30% off sale on all sheet metal, and since they don't charge for shipping, we were able to get a pair of doors for only $200 each. But for some reason when they sent me the invoice for the order the next morning,,, they ended up only charging me $165 each (shipped),,,, Must be for my high volume discount,,, I know I wasn't going to argue with them. 

By the end of the week the doors arrived,,, nice looking parts! We mounted the right side door & it fit pretty well,,, just a couple of tweaks and we were good. We mainly wanted to mount the door at this time, just to make sure that the door frame was still square with the world & that with all of the cutting & welding that we've done to this point, didn't affect the alignment of the body.

The next item we wanted to get in, was the RR wheelhouse. We had previously purchased all 4 individual wheelhouse halves, since this was much cheaper to do, since we have a good spot welder,,, Mistake! The inner sections were very nice & fit pretty well, but the outer sections weren't even close,, and I saw no way to get them to even come close to working properly,,, so back online I went,, and once again it was CJ Pony to the rescue with another sale,, so I ordered the RR wheelhouse for $137 shipped. It showed up the other day and looks to be a real nice part,,, it's just missing the indentation on the rear of the inner section, that I think is for spare tire clearance,,, but since the original inner panel I have has the indentation in it,,, I should easily be able to patch it in. Hopefully we'll try to put it in, in the next couple of weeks.

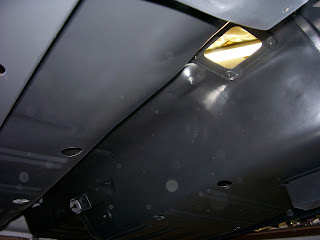
So while we were waiting for all of these new parts to arrive,, we did a little bit of body work to the underside of the new floor pans that we installed. We then hand sanded them & sprayed the with a couple of coats of satin black Rust Encapsulator, followed by a coat of Under Hood Satin Black, top coat paint. This stuff is pretty wicked, so you definitely want to wear a good respirator, goggles, and a hat. We were very pleased with the results.


Sorry about the pictures,, I didn't realize that there was dust in the lens. Once the paint dried over night, we seam sealed the underside of the floor. This is a very messy thing to do, along with, not an easy thing to do,, very hard to make the sealer look beautiful,,, but after seeing the mess the factory did on the original seam sealer,,, I guess I should be happy with how well it turned out.


Brent then cleaned & prepped the front end of the car so we could get it sealed & painted. We got most of it done, but we short 1 can of Encapsulator, so we'll have to finish it later.


Today we spent a bit of time getting the Strengthening Plate fitted to the cowl. This is the plate that the Shelby cars had added to them. It is welded to the front of the cowl and sits under the heavier duty, 1-piece style of Export Brace. I was fortunate enough to acquire a new heavy duty brace on Ebay. If you remember,, earlier we cut off the factory 2-piece export brace mounting tabs that were welded to the shock towers to make room for this much stronger style of brace. We mounted the brace up on the car, bolted it down, and welded the strengthening plate on,,, this came out real well,,, just have to finish grinding down the welds, which won't even be seen, since the outside edges all get covered with seam sealer.


It's amazing how many small details there are, when you build & enhance a car like this,,, but it's all of these small details that add up to make a super nice car, that goes above and beyond what the factory ever did to them.

Till next time,,,